How to configure 2FA for Confluence: U2F & TOTP?
Note, U2F devices work only with a secure HTTPS connection. If you want to use U2F devices, make sure that your instance is already using it.
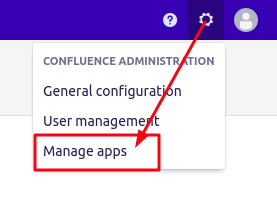
Step 1. Go to Confluence Administration tab and click Manage apps.
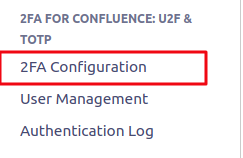
Step 2. On the left side menu panel find “2FA FOR Confluence: U2F & TOTP” tab and click 2FA Configurations.
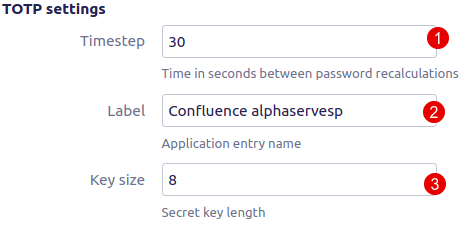
TOTP settings
Warning! It is not recommended to change these settings. Some Authenticator applications like Google Authenticator can handle default 30 seconds, so changing this value to a greater or fewer one won't allow users to log in.
1. Timestep is the interval in seconds between the previous and the new generation of the PIN code. By default, all Authenticators use 30 seconds. Change it only if you are using your own Authenticator with a different value.
2. Label will be displayed by the mobile Authenticator as an identifier for the underlying Atlassian application
3. Key size is the length of the generated secret key (needed for TOTP algorithm). By default, all Authenticators use 8. Change it only if you are using your own Authenticator with a different value.
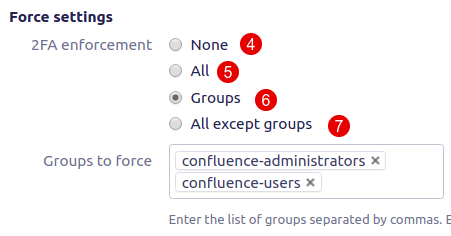
Force settings
4. None - if you choose this option, 2FA will not be compulsory for Confluence users. If you need to make it compulsory - use others below.
5. All - it’s compulsory for all users.
6. Groups - it’s compulsory only for selected groups of users.
7. All except groups - it’s compulsory for all users except selected groups of users.
IP whitelist settings
8. Mark the checkbox Enable IP whitelist to enable whitelist of IP addresses that pass without a 2FA check.
9. Enter the desired IP address.
10. Enter the IP comment to recognize the IP address from the list (not required).
11. Applies to:
All if the user’s IPs are retrieved from all IP headers.
LAN if the user’s internal IPs are retrieved from headers.
12. Click the Delete button to delete IP.
13. Click the Add filter button to add IP to whitelist.
![]() You can find more information about IP whitelist settings here!
You can find more information about IP whitelist settings here!
Relative URLs whitelist settings
Enter the relative URLs of other plugins, it allows you to access them without a second authentication factor.
![]() Please note: Each URL should be a separate row.
Please note: Each URL should be a separate row.
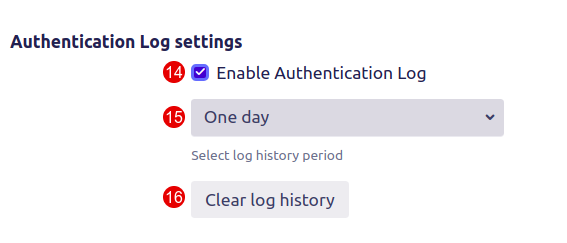
Authentication Log settings
14. Mark the checkbox Enable authentication log to allow logging all action with 2FA. For example: adding or remove the device, log it into the system with Authenticator or U2F device.
15. If you want to clear the logs select the retention period and click the Clear log history button.
16. Clear log history. One-time deletes the log history except for the retention period.
After log history clearing all-new authentication logs will be saved in the application regardless of the selected log history period until you clear it again.
![]() You can find more information about Authentication Log here!
You can find more information about Authentication Log here!
"Remember me" settings
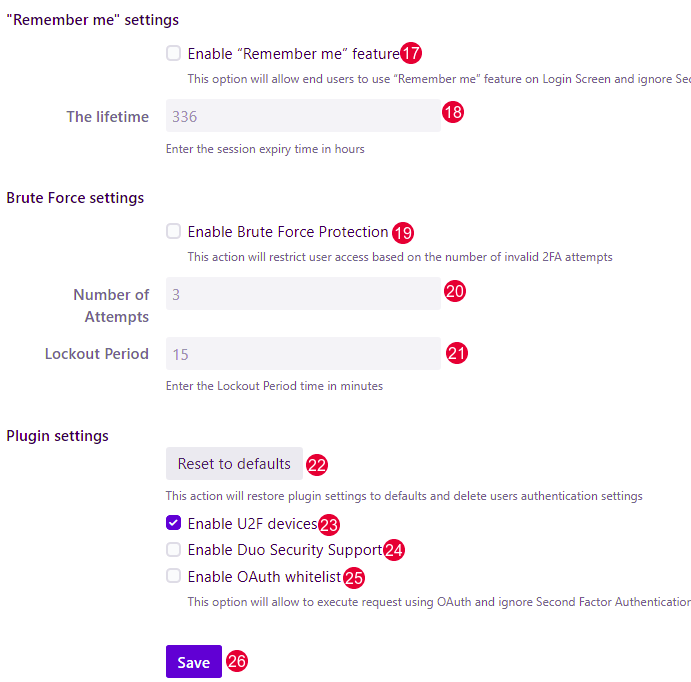
17. Enable "Remember me" feature checkbox. This option will allow end-users to use “Remember me” feature on Login Screen and ignore Second Factor Authentication.
![]() Please note: This feature will be useful if during the day you often log out and log in to Confluence, but you have to make sure that using this feature complies with the security requirements in your company.
Please note: This feature will be useful if during the day you often log out and log in to Confluence, but you have to make sure that using this feature complies with the security requirements in your company.
18. Set the desired session expiry in hours (max number is 336 hours).
“Brute Force” settings
19. Enable Brute Force Protection. This will lock out a user for a specified amount of time if that user generates the specified number of login failures.
20. Number of Attempts - specified number of login failures after which the user will be locked out.
21. Lockout Period - a specific amount of time during which the user will be locked out.
Plugin settings
22. Reset to defaults. This action will restore plugin settings to defaults and delete users' authentication settings.
23. Mark the checkbox Enable U2F devices to turn on the U2F device for login.
24. Mark the checkbox Enable Duo Security Support to enable support for Duo Authenticator.
Note: Enabling DUO support allows users to successfully apply valid TOTP code from the DUO mobile app and avoid ‘Authentication failed’ message.
25. Mark the checkbox Enable OAuth whitelist to allow execute requests using OAuth and ignore Second Factor Authentication.
26. Click the Save button to save the configuration.
