Database Container Launch
The container is started using the docker command with the appropriate settings:
| Code Block |
|---|
docker run
  --name postgresql-9.6.9
  --volume /opt/postgresql9.6.9/dbdata:/var/lib/postgresql/data
  -e POSTGRES_PASSWORD='{STRONG_PASSWORD}'
  -p 5442:5432
  -d
postgres:9.6.9 |
Let's consider each of these parameters:
--name postgresql-9.6.9 - container name. Consists of the database type postgresql and version 9.6.9.
--volume /opt/postgresql9.6.9/dbdata:/var/lib/postgresql/data - container volume. You can read more about this on the corresponding docker manual page. But, at the moment, it is enough for us to know that the volume is used to save our data if the container is restarted or rebuilt. /opt/postgresql9.6.9/dbdata - the folder in the external system where our data will be stored. /var/lib/postgresql/data - the folder inside the container, which we want to save.
-e POSTGRES_PASSWORD='{STRONG_PASSWORD}' - required container variable which set the superuser password for PostgreSQL.
-p 5442:5432 - using this parameter, we set the port that will provide access to the container. 5442 - external port on which this container will be available.
| Status | ||||
|---|---|---|---|---|
|
docker ps -a to view all running and stopped containers.5432 - the port on which the database is accessible inside the container. Thus, we forward requests from an external port to an open port inside the container.
-d - mean “detach”, we run container in background
postgres:9.6.9 - indicate the PostgreSQL image that exists on the docker hub with the corresponding version.
As a result of execution, we will see the following console picture:

Database Console Launch
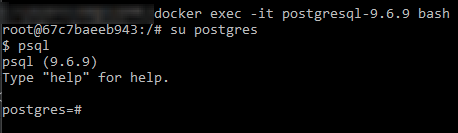
Logging into the bash console of a docker container is done using the command:
| Code Block |
|---|
docker exec -it postgresql-9.6.9 bash |
The database console is launched using two commands:
| Code Block |
|---|
su postgres
psql |
As a result, we will observe the following picture in the console:
Setting Up The Database and Access Mode
The database is configured using sequential execution of SQL queries.
Let's create a role with which SQL Connector will have access to the database:
| Code Block |
|---|
CREATE
  ROLE exportuser
  PASSWORD '{STRONG_USER_PASSWORD}'
NOSUPERUSER NOCREATEDB NOCREATEROLE INHERIT LOGIN; |
{STRONG_USER_PASSWORD} - the password that we will later use to export data by SQL Connector. As we can see, this role will not be a superuser and will not be able to create databases or roles. This is a necessity for security reasons.
Let's create a database that will be used to export data:
| Code Block |
|---|
CREATE DATABASE exportdb
  WITH
    ENCODING 'UNICODE'
    LC_COLLATE 'C'
    LC_CTYPE 'C'
TEMPLATE template0; |
Let's connect to the database we created and create a data schema that SQL Connector will use:
| Code Block |
|---|
\connect exportdb
CREATE SCHEMA exportschema; |
We will give the role that we created earlier as development access to this scheme.
| Code Block |
|---|
GRANT CREATE, USAGE ON SCHEMA exportschema TO exportuser; |
As a result, we will see the following picture in the console.

You can exit the database by writing with the command \q and exit from console by exit.
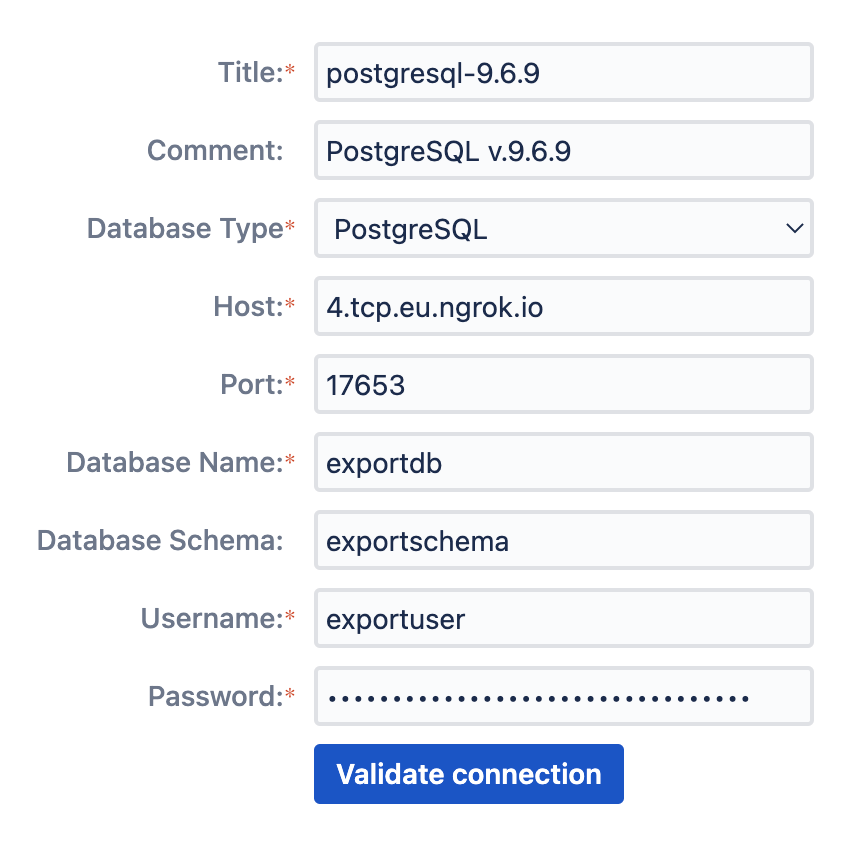
Let's check if we have configured our database correctly and try to connect to it. Go to SQL Connector add-on and on the step of adding a database, click “Validate connection”.
| Info |
|---|
Step-by-step guide on how to connect Jira to PostgreSQL database ⬇️ |