| Table of Contents |
|---|


Create Vault Account
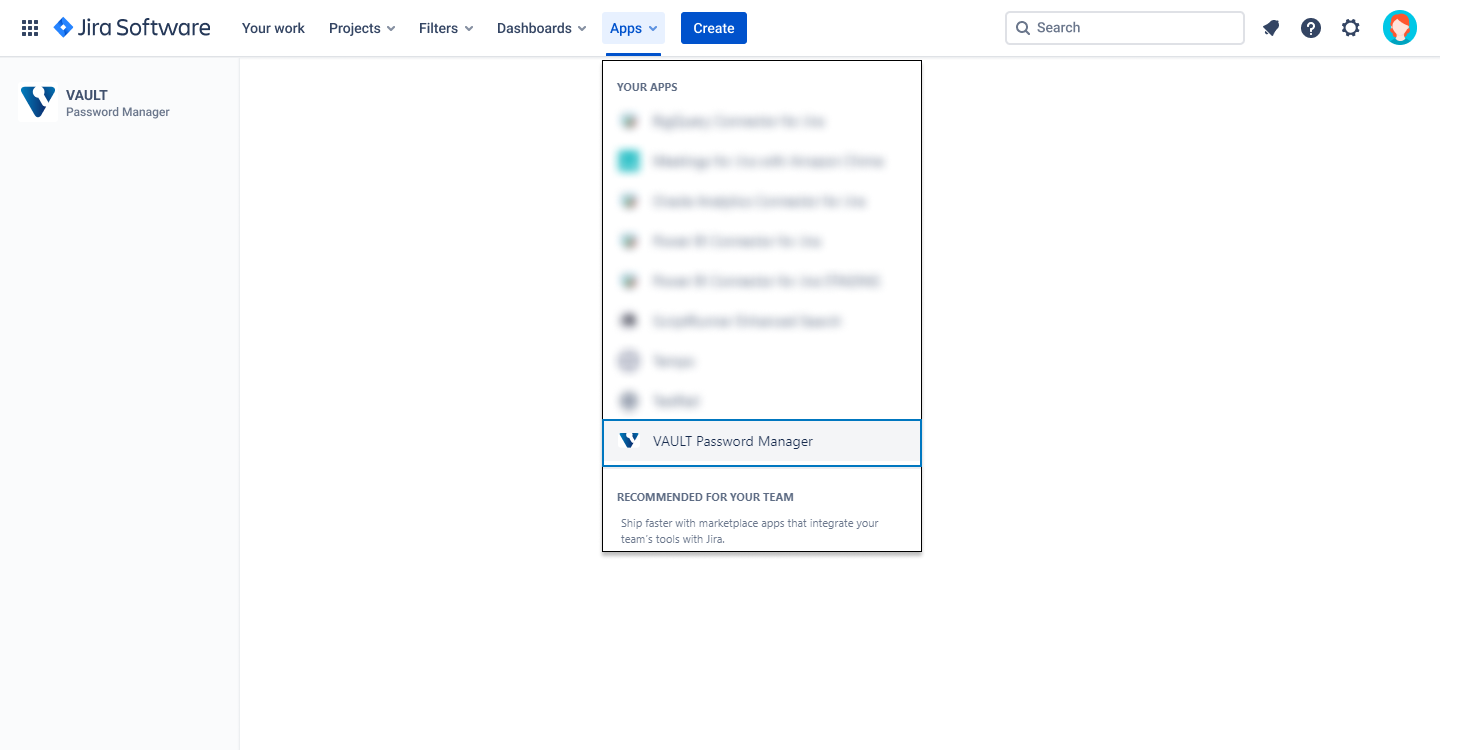
Access Vault Password Manager from the Jira main navigation menu: Apps → Vault Password Manager
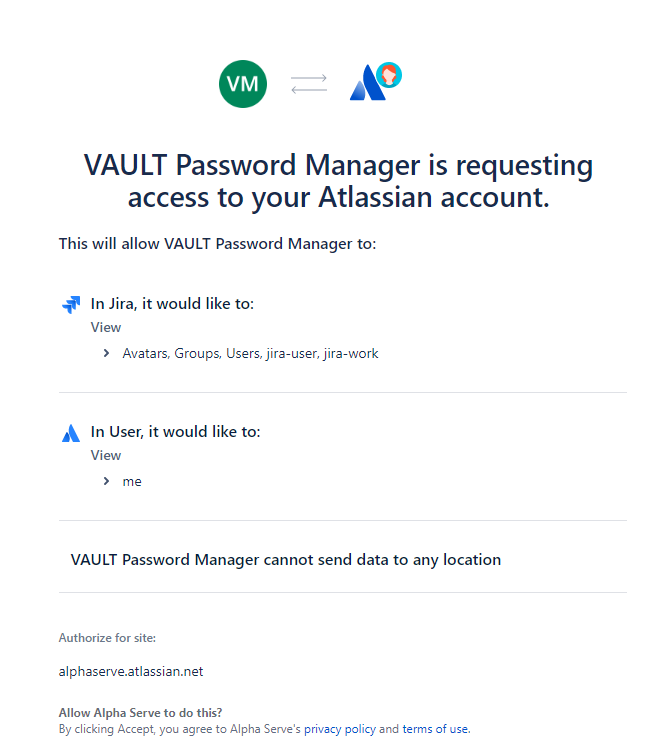
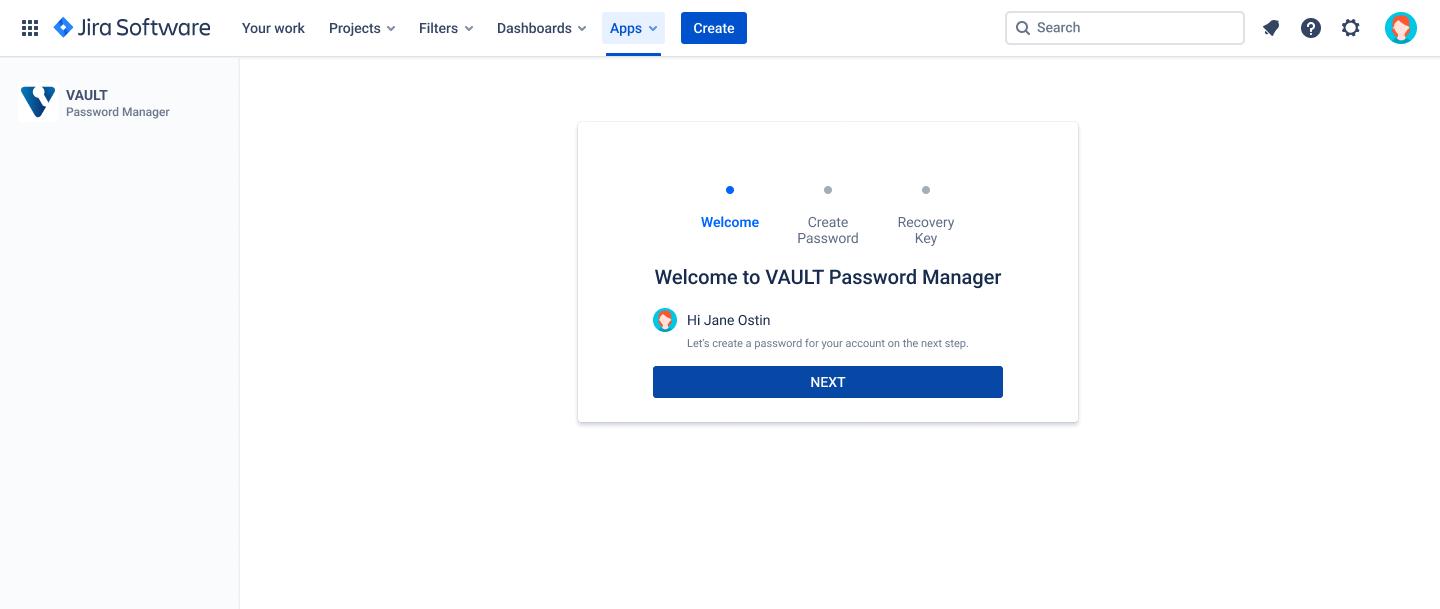
To start using Vault Password Manager, you have to create your account. Click Accept button to authorize the app to access your Atlassian account.
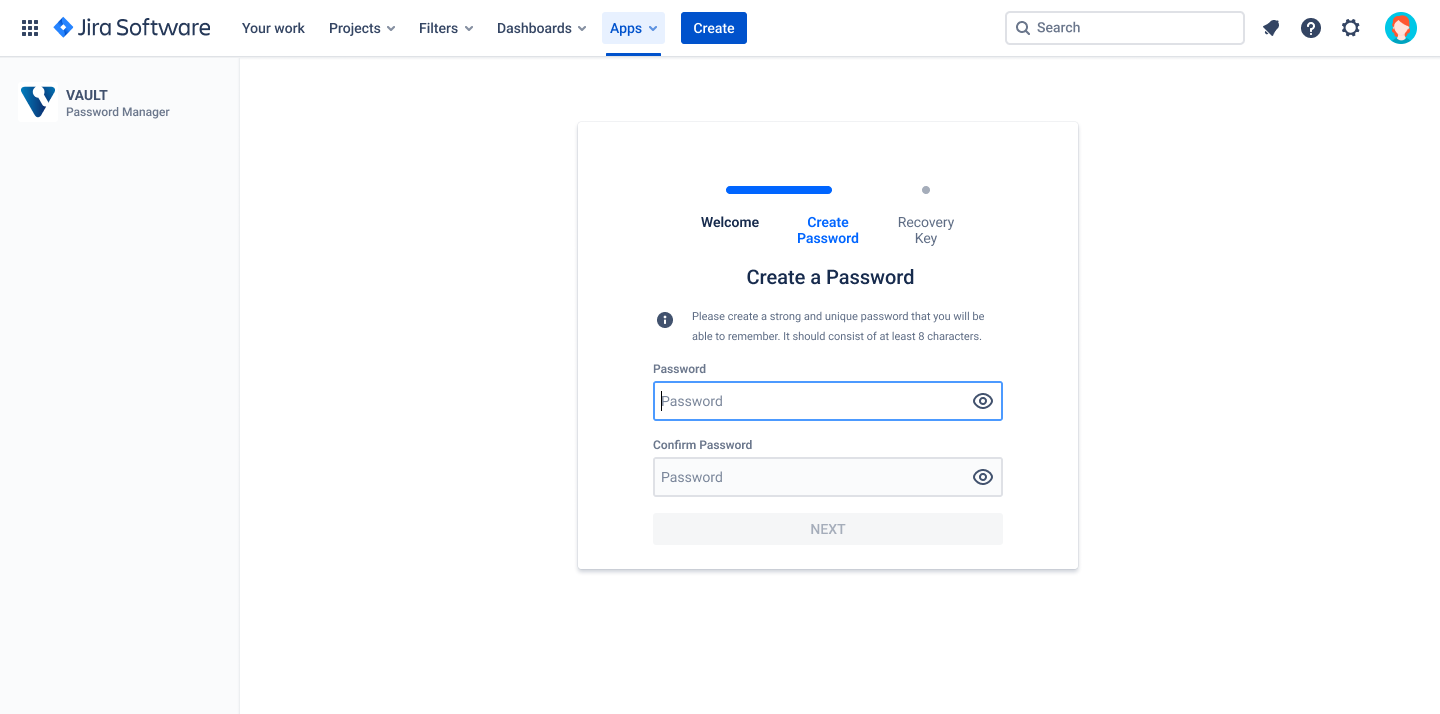
Create Password
You will be automatically redirected to the Welcome page to create your Password, which acts as an additional security layer to your current Jira password. The Vault account password unlocks the app and decrypts the items for you.
Click Next to proceed with the password creation.
Create a strong and unique password that you will be able to remember. It should be of at least 8 characters. Confirm your password and click Next.
| Info |
|---|
Vault Password Manager doesn’t have access to your Password. |
Download Recovery Key
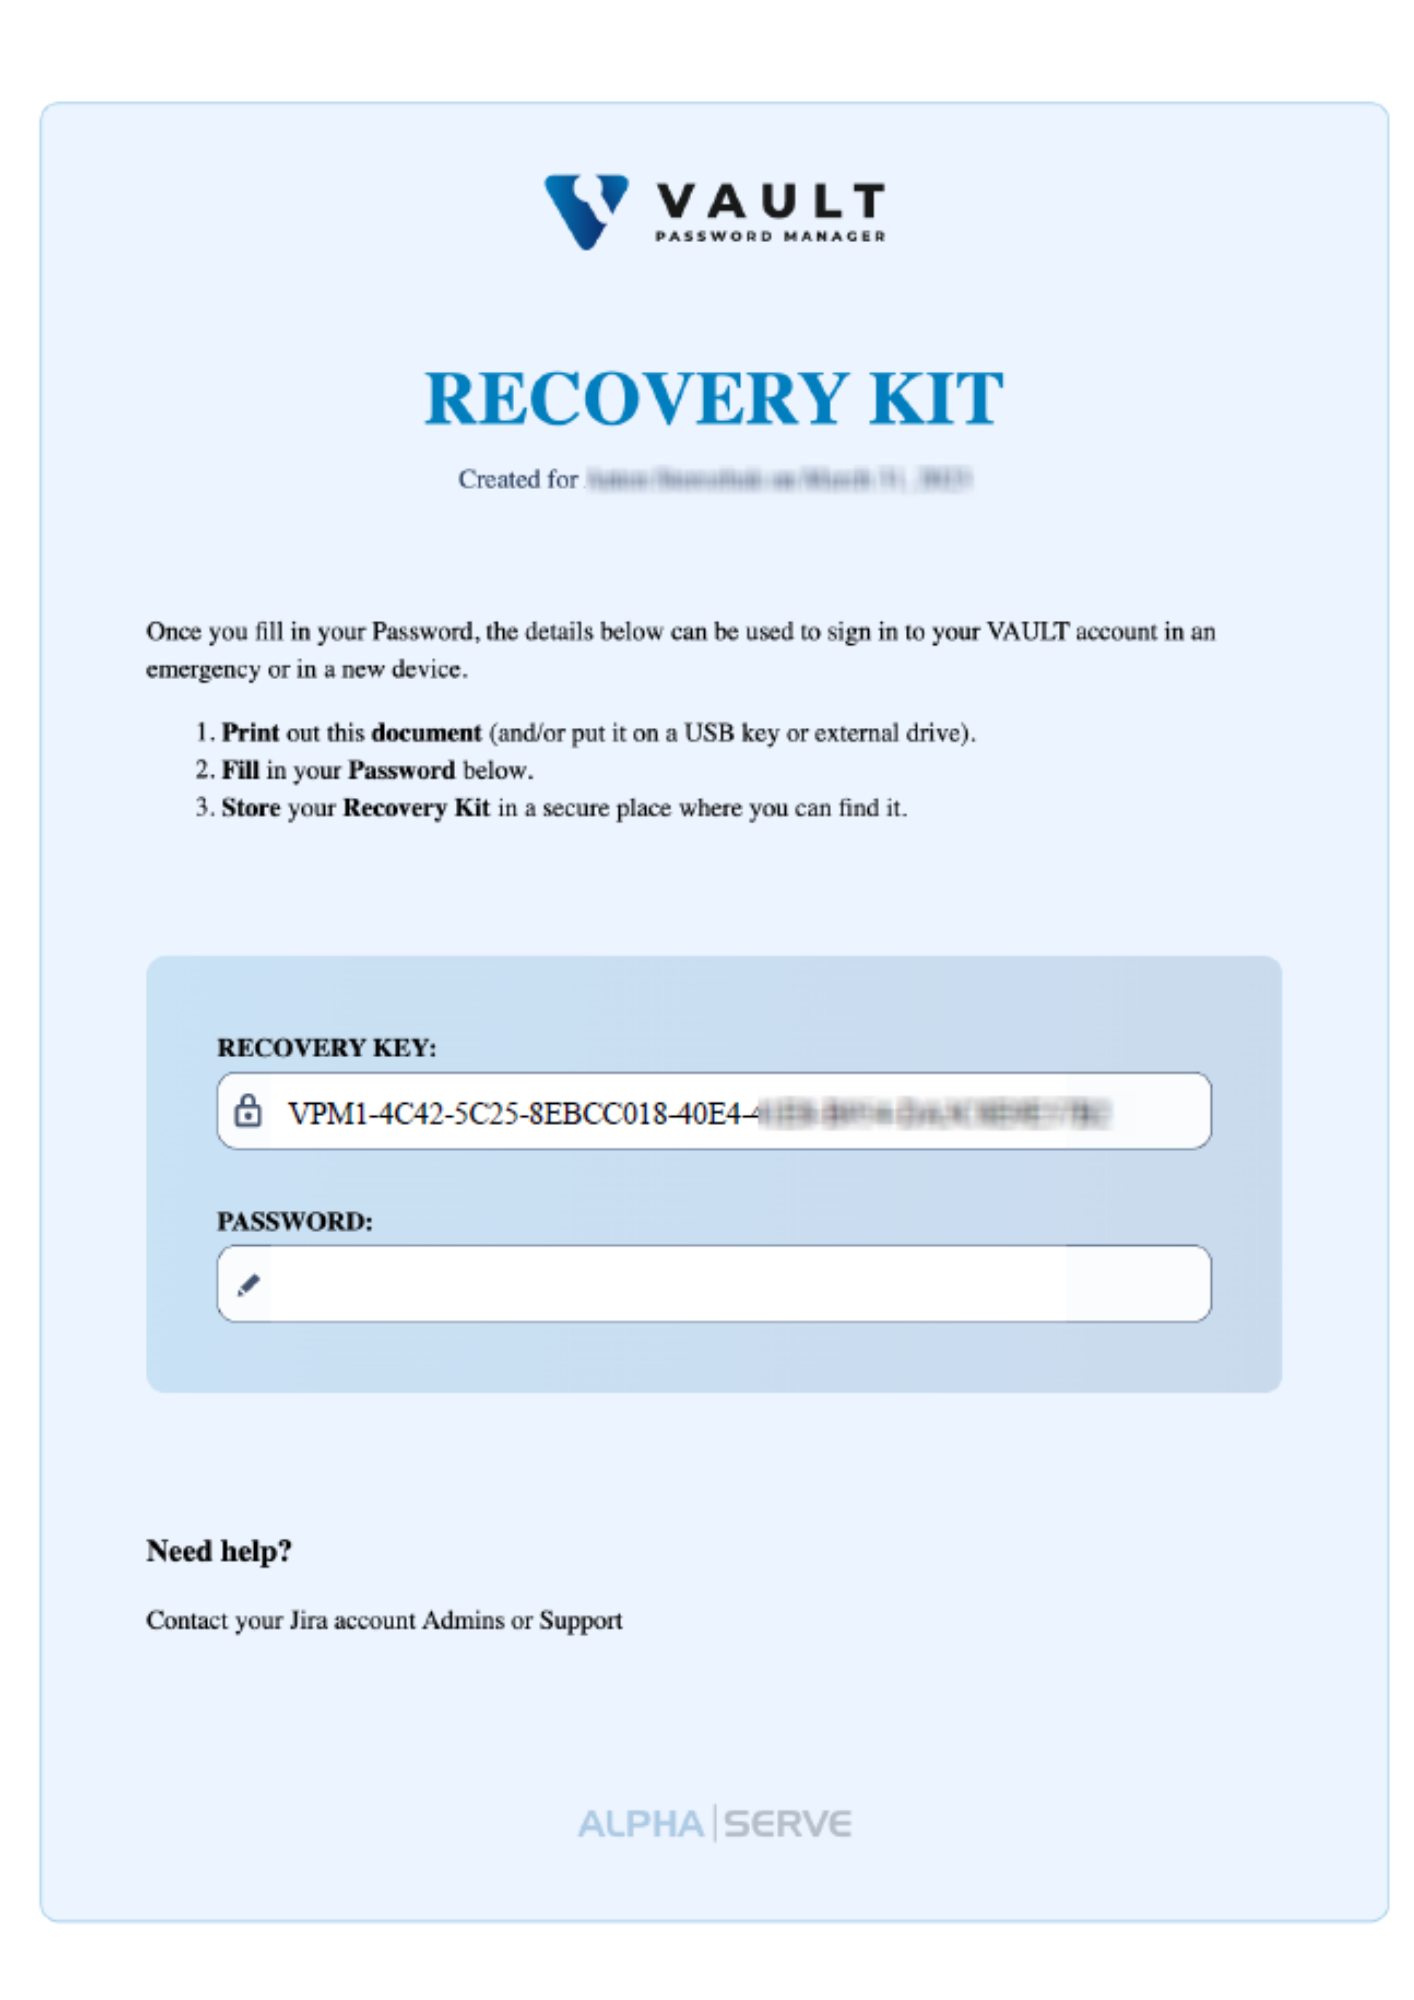
A recovery key is a randomly generated 44-character code that you can use as an alternative way to regain access to your account in case of password loss. While it’s not required, Vault Password Manager uses a recovery key to improve security when signing in to the account.
Press DOWNLOAD button to download the autogenerated Recovery Key as the PDF file.
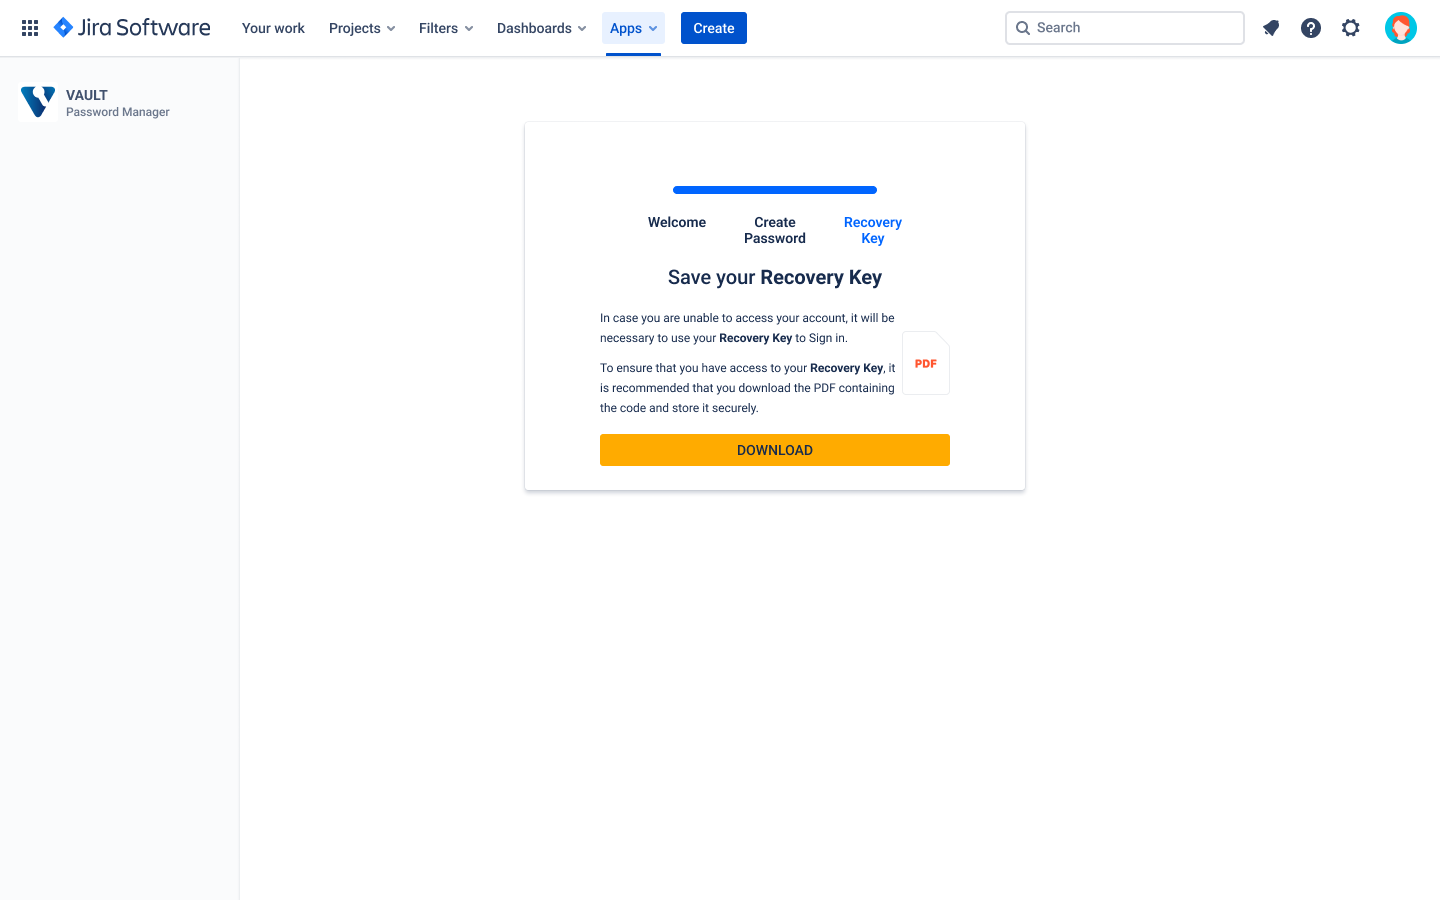
To ensure its safety, we recommend you print it and keep it somewhere safe.
In case of loss, you can generate a new Recovery Key. See the instruction here.
Sign In to Vault Account
To access your Vault account, you must sign in using your Vault account password.
Go to the Jira main navigation menu and select "Apps"
Choose "Vault Password Manager" from the list of available apps
Enter the password to the Vault account
Press SIGN IN button.
The Recovery Key will be automatically retrieved if you sign in from the device where it was previously saved.
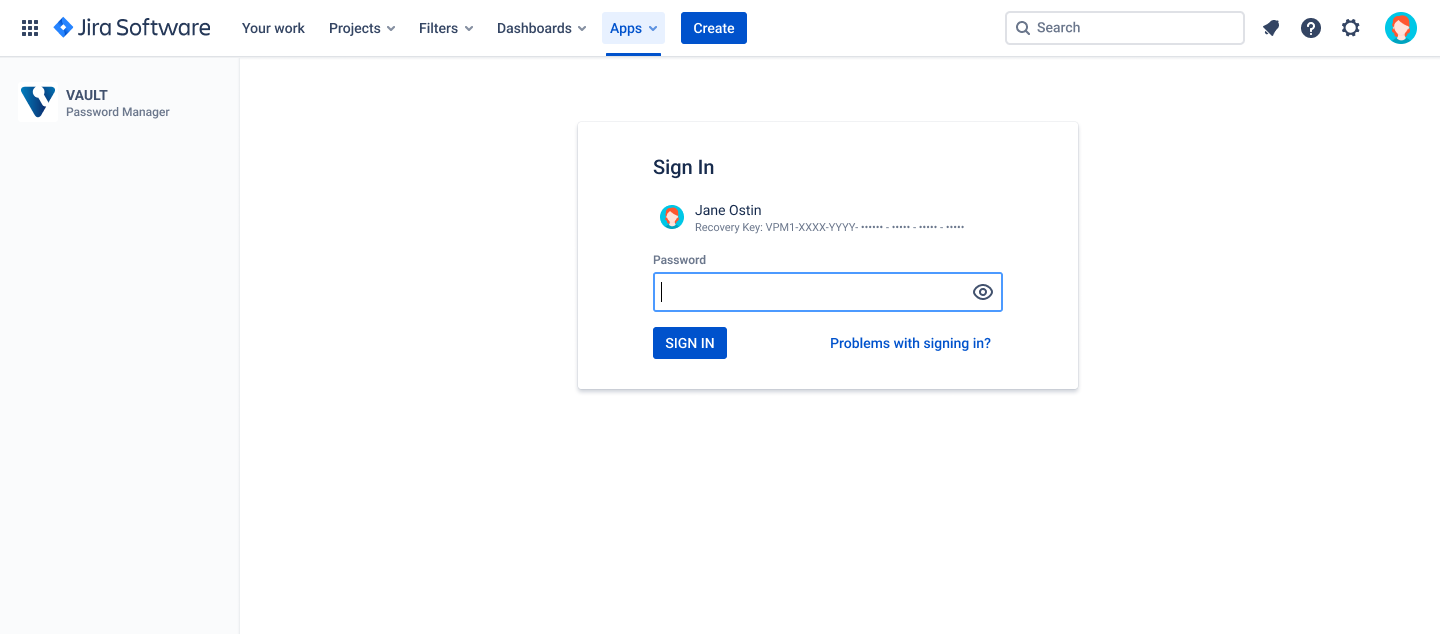
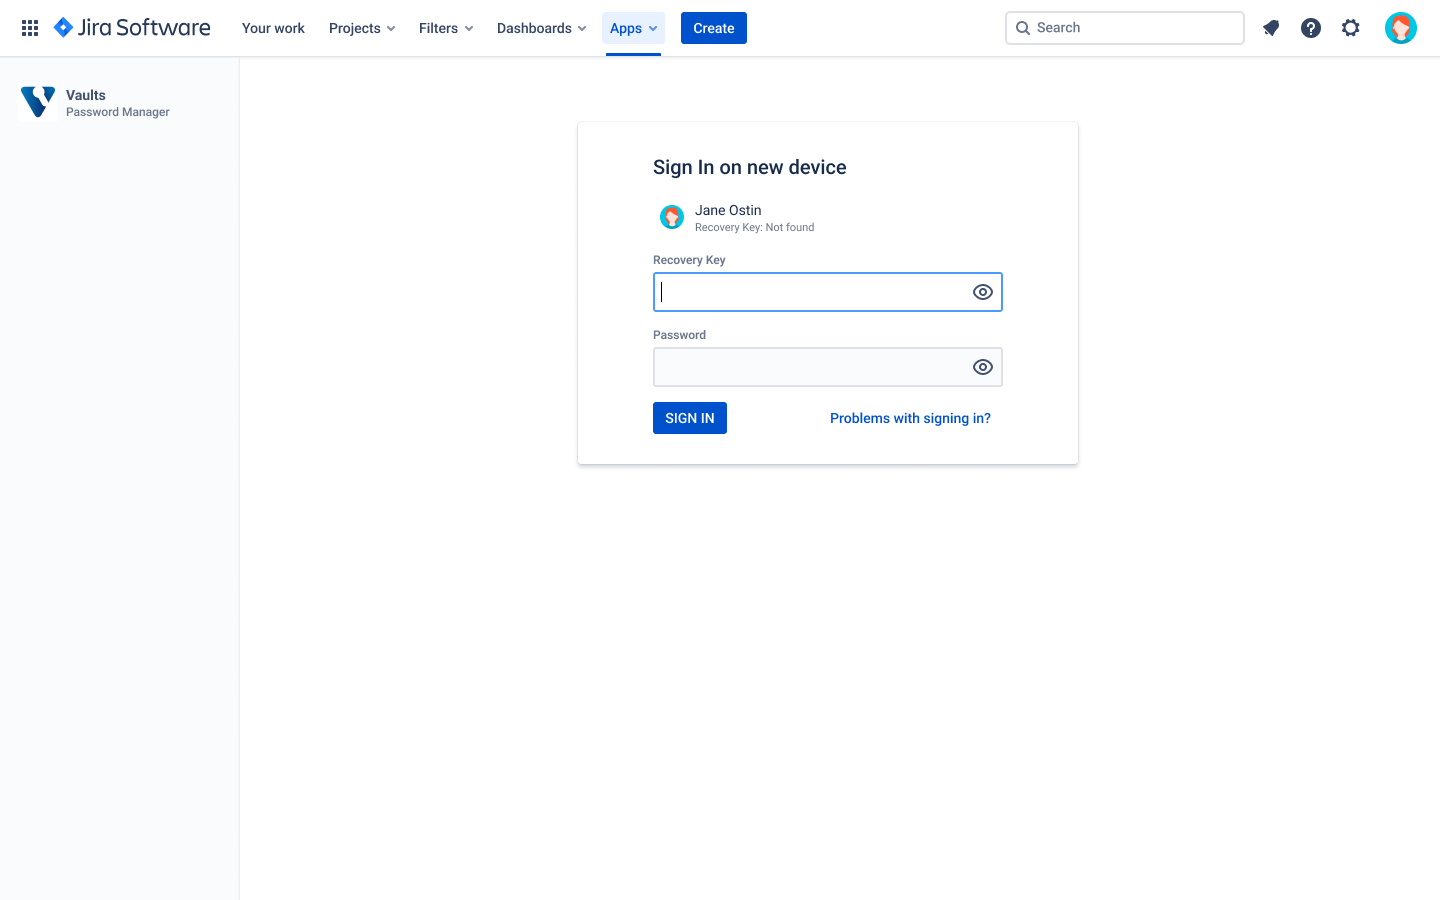
Sign In to Vault account from a different device
If you are signing in from a different device than the one where you originally set up Vault Password Manager, you must also provide a Recovery Key for additional security.
Follow these steps:
Enter your Recovery Key
Enter Vault account password
Press SIGN IN button.
Note: The Recovery Key is a backup method to access your account if you forget your password or lose access to your primary device. Keep it safe and secure.
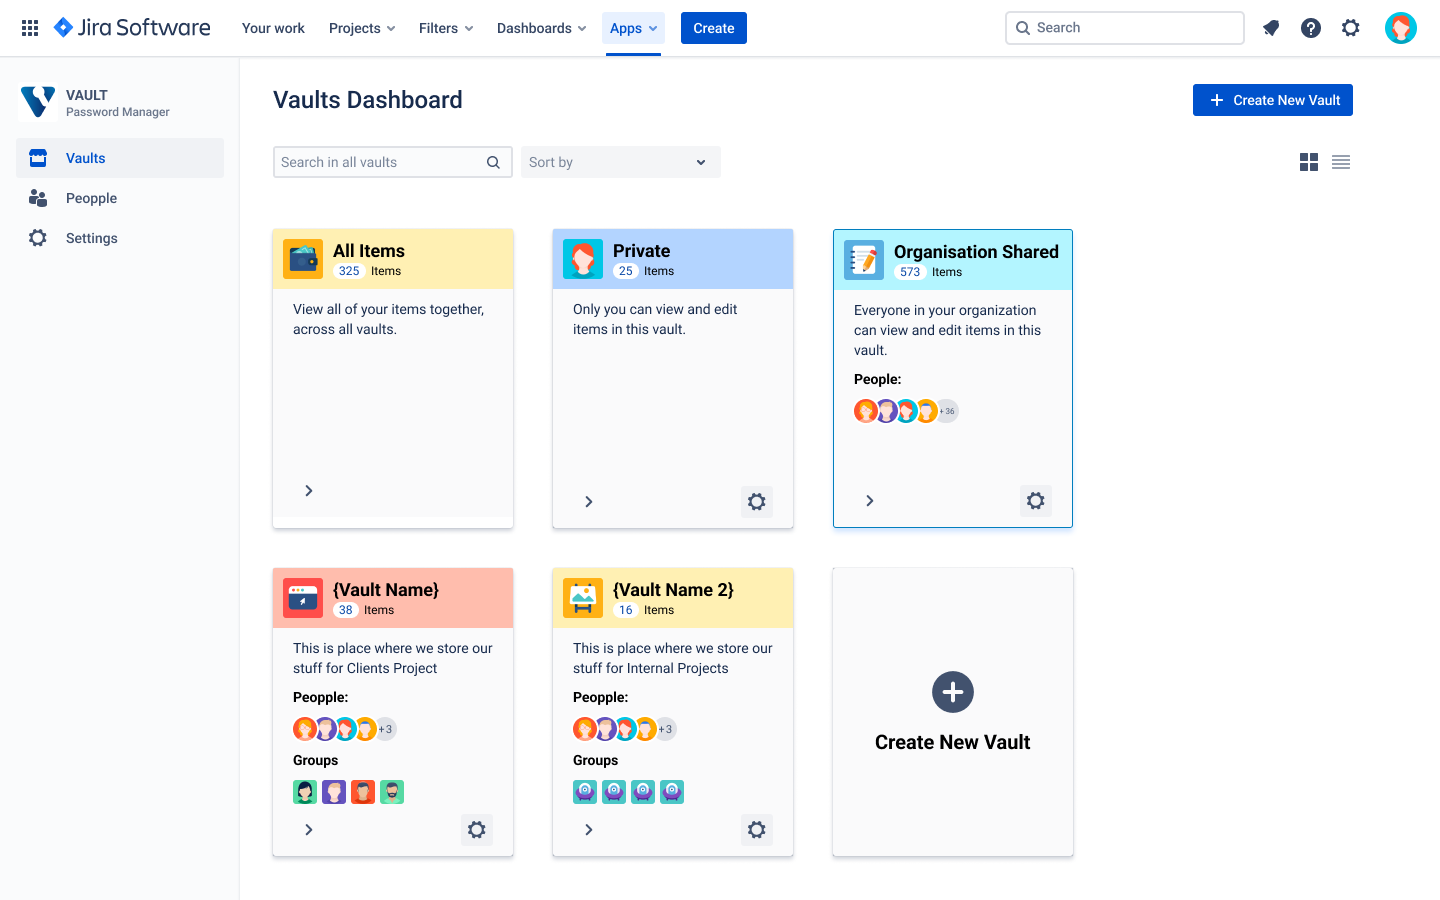
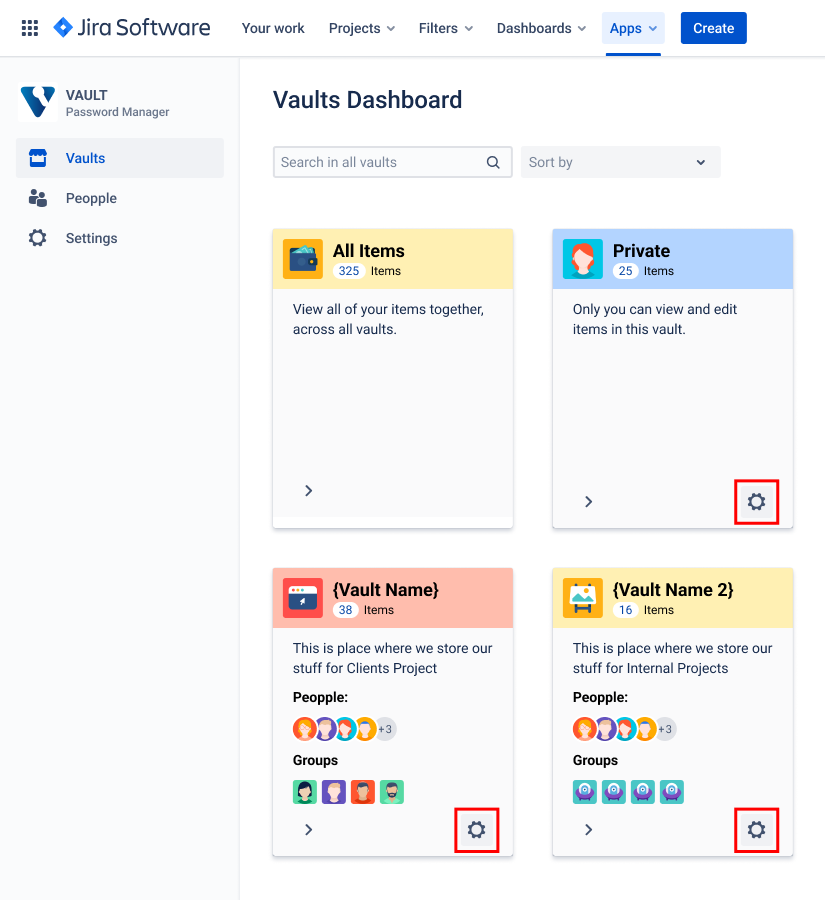
Vault Dashboard Overview
Once you sign in, you will be redirected to the Vaults Dashboard page, where you can see all your Vaults.
Below you can find a description of the fields, buttons, and settings on this page.

Types of vaults
Private Vaults: Private vaults are exclusively for personal use and are encrypted to ensure complete data privacy. They cannot be accessed by anyone else.
Organization Shared Vaults: These vaults are shared across the entire organization and can be viewed by any member. They can also be edited or shared based on the edit permissions granted.
Created Vaults with Individual Edit Permissions: These vaults are created with custom edit permissions set individually, allowing complete control over who can view, edit and share the vault.
Dashboard view
You can change the dashboard overview by clicking the responsive icon.
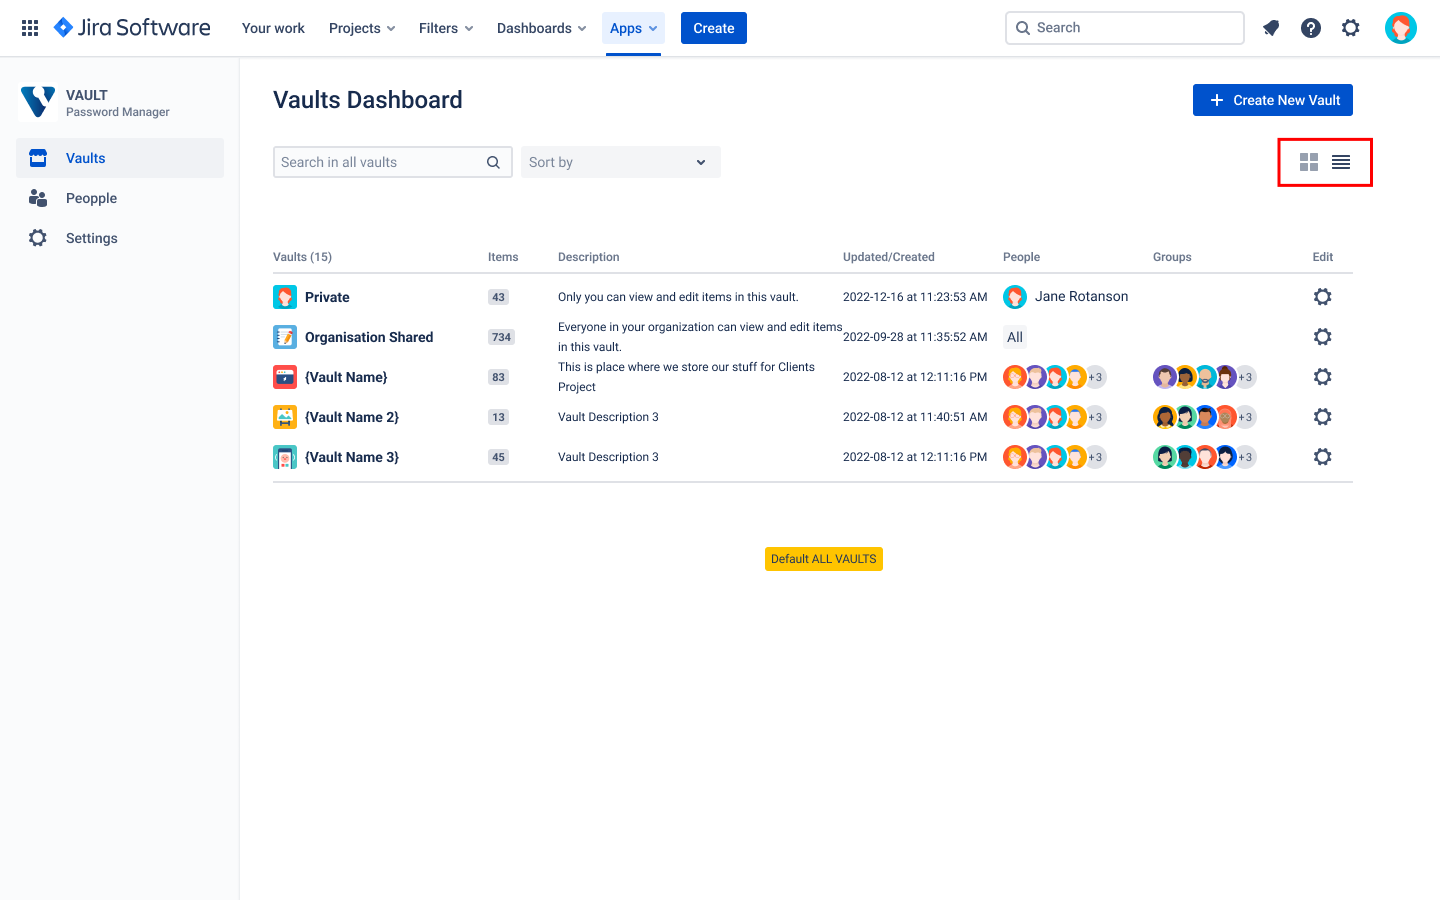
Navigation tab
Vaults tab is visible to all users and allows them to view all vaults.
People tab is visible only to Jira Admins and is used to manage password recovery requests.
.png?version=1&modificationDate=1680192201980&cacheVersion=1&api=v2)
Create, Edit and Share Vaults
Permissions in Vaults
View. Can view items in the Vault.
View&Edit. Can create, edit, delete & export items in the Vault.
Full. Can grant and remove access to the Vault.
Follow the steps below to create, edit, and share vaults in Vault Password Manager according to the permissions. Vaults are secure containers that store and manage sensitive information such as passwords, API keys, and other confidential data, called Items.
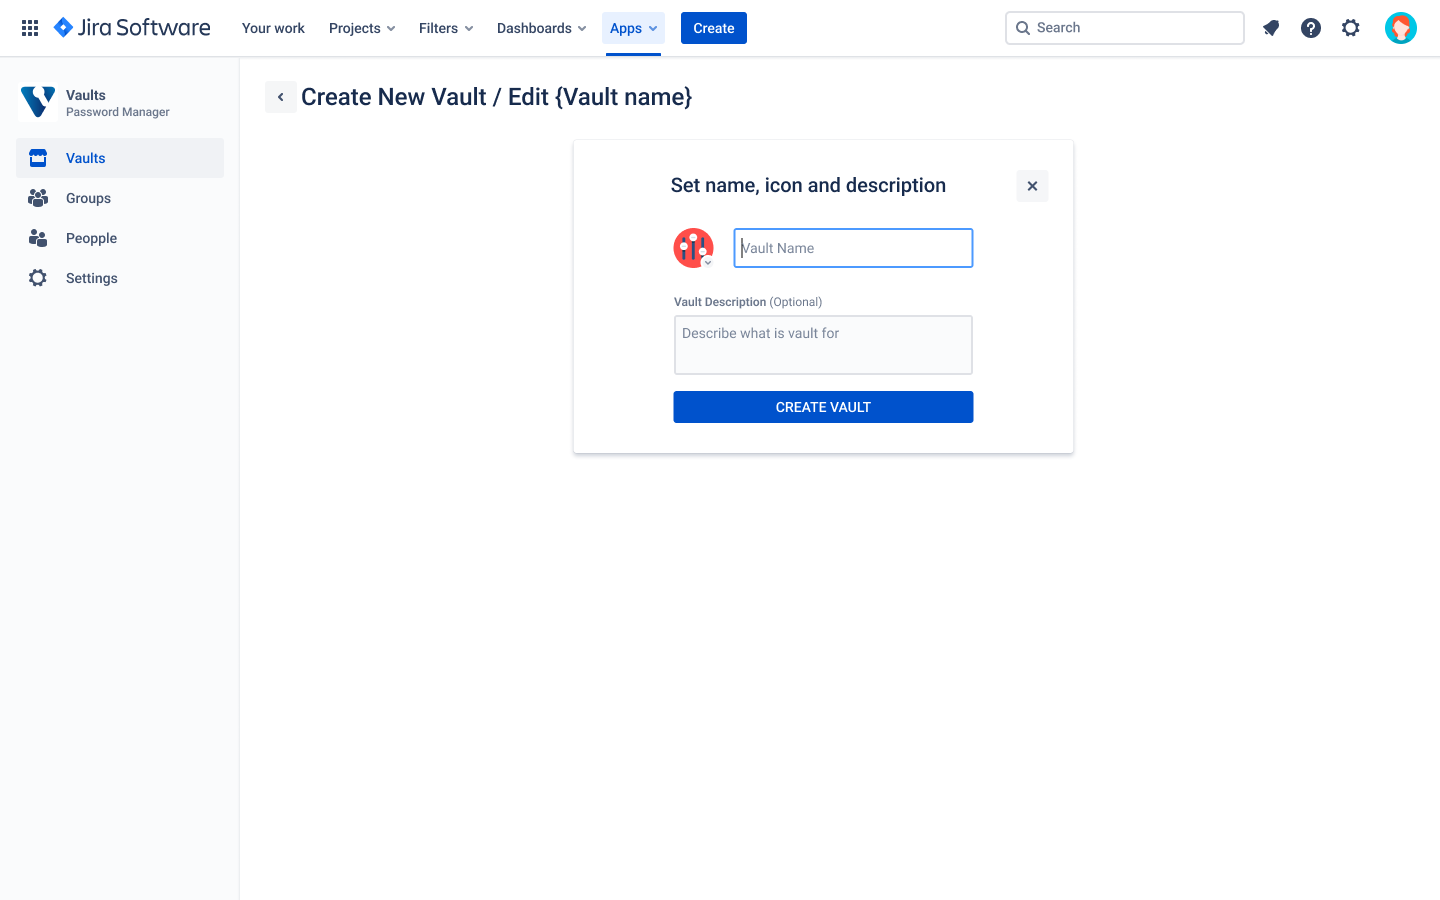
Create New Vault
Navigate to the Vault Dashboard and choose + Create New Vault button at the top right of the page or press + Create New Vault card next to the created Vaults.
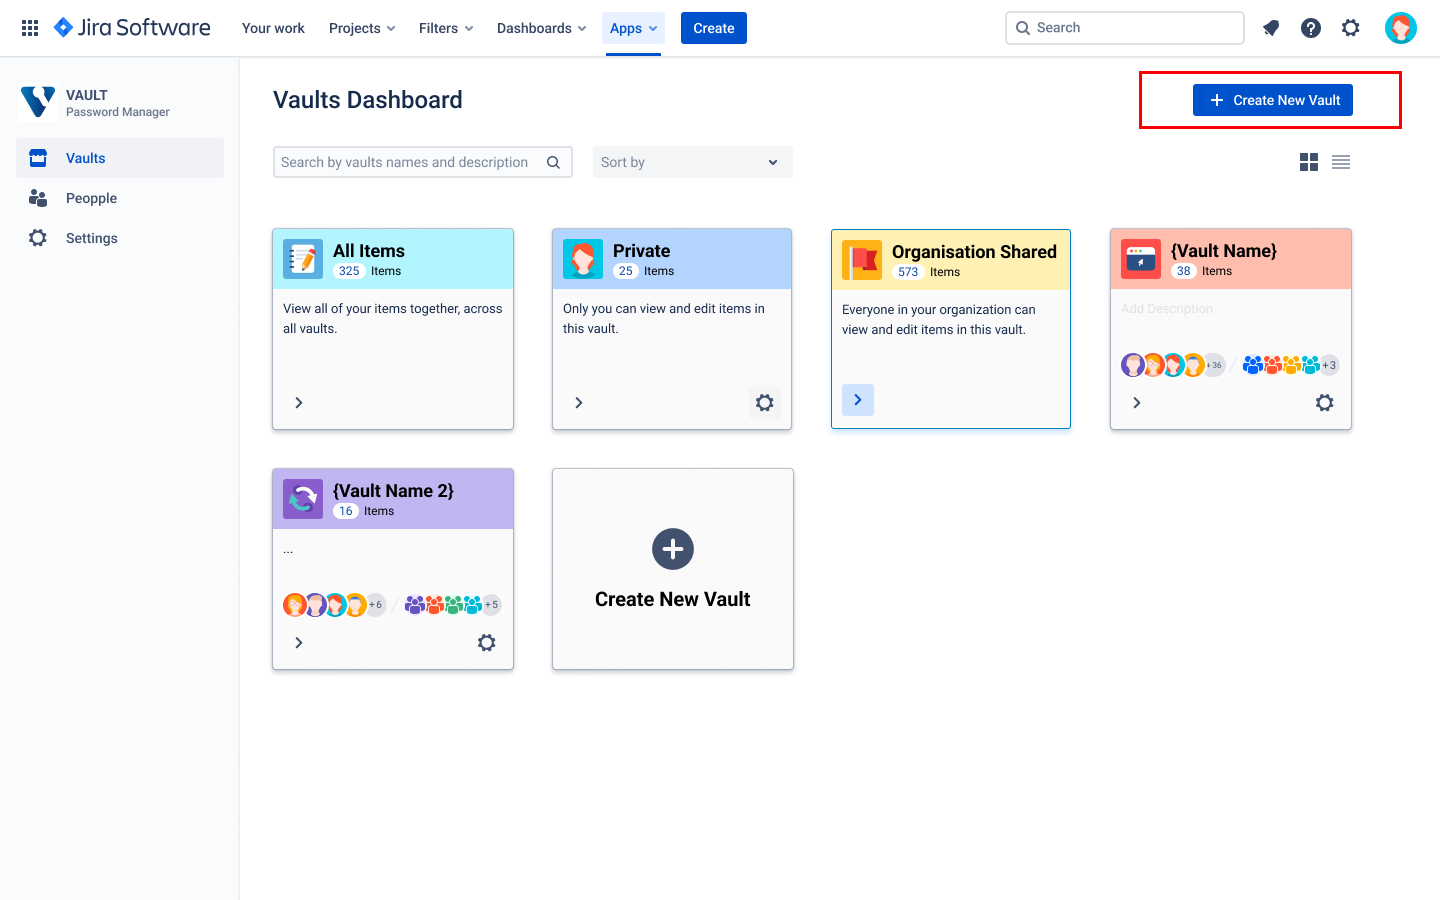
Enter Vault Name and Description then click Create Vault.
| Info |
|---|
User who created the Vault has “Full” permissions by default. |
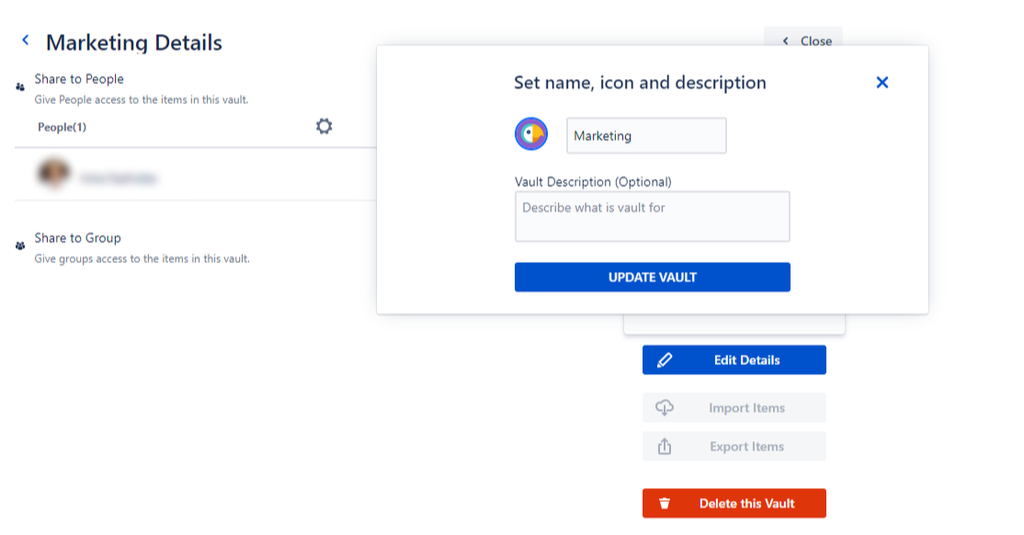
Edit Vault
| Info |
|---|
To edit Vault, you need to have “View&Edit” or "Full" permission on it. |
Navigate to Vaults Dashboard. Click on the Gear icon on the responsive Vault. It will redirect you to the Vault details page where you can Edit Vault Details, Share Vault, and Delete Vault.
.png?version=1&modificationDate=1686323106232&cacheVersion=1&api=v2)
Click Edit details to set name, icon and description, then click UPDATE VAULT button to save changes.
Share Vault
| Info |
|---|
To share Vault, you need to have "Full" permission on it. |
You can share Vaults with Jira Users or Groups.
Share Vault with Jira Users:
1 Press Share to People to share Vault with Jira Users.
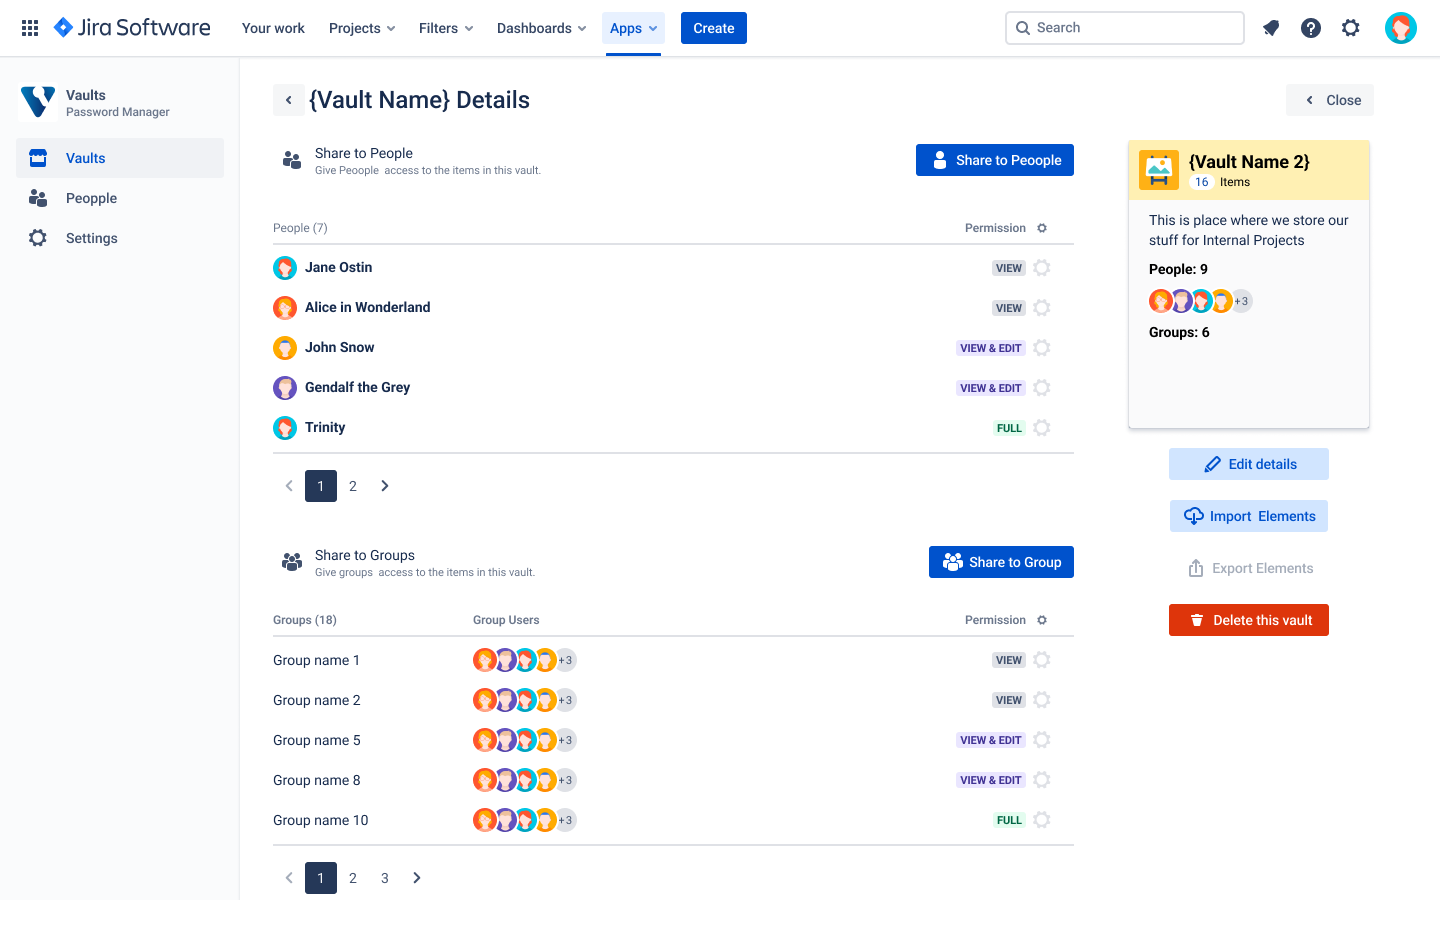
2 Use the search bar for easy navigation. Enter Users name or Email, then click Share next to the Users you want to add.
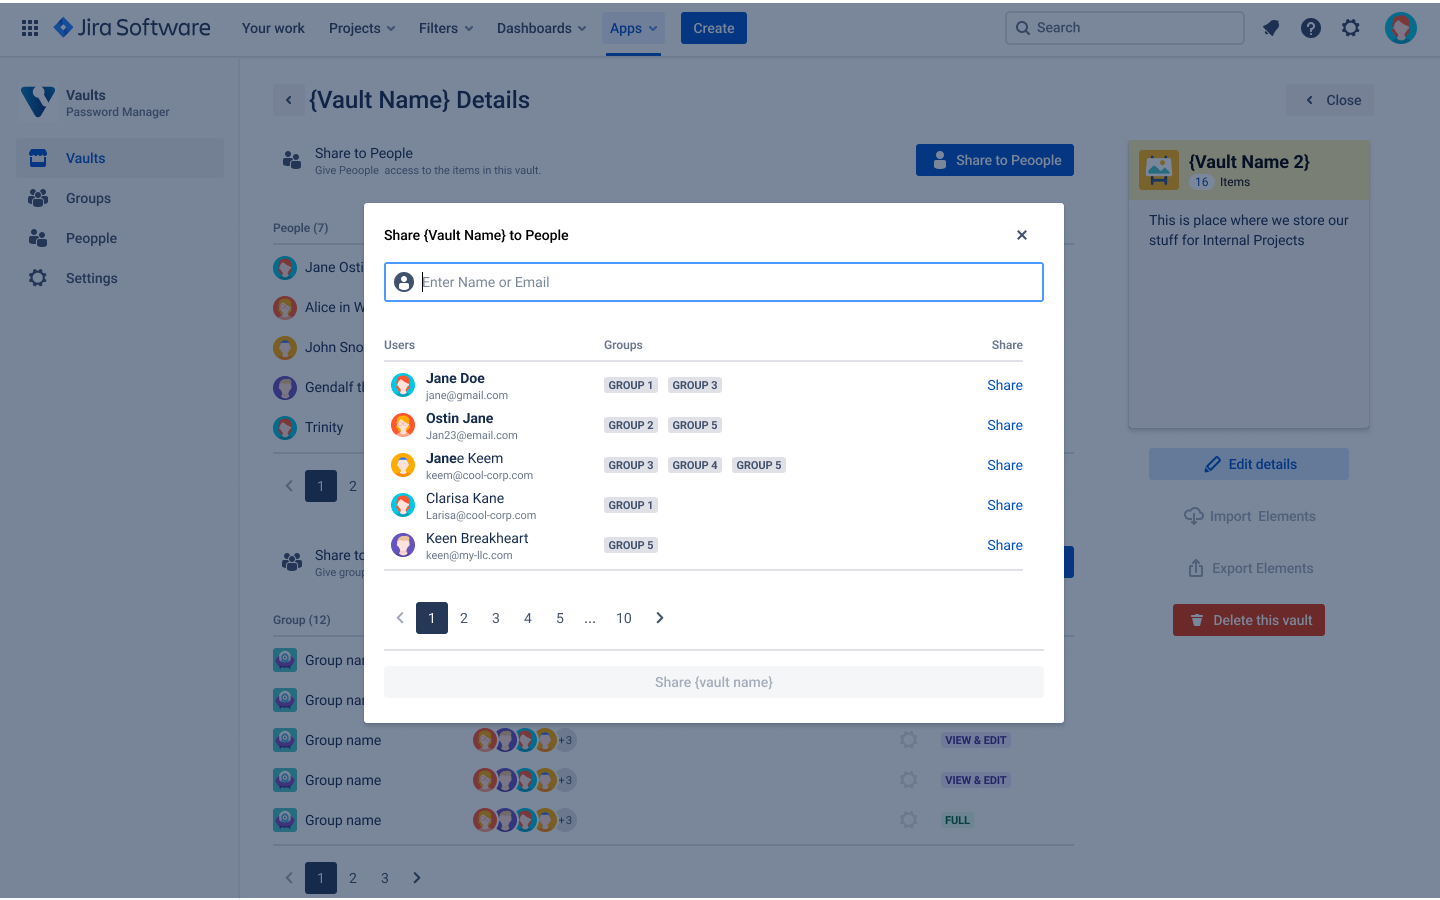
3 Review the list of all added Users. If required, set permissions for each User, press on the setting icon and choose one of the available options: Allow View, Allow Editing, or Allow Managing and click Close icon.
4 Press Share (Vault name) button to confirm Vault sharing to all selected Users.
Share Vault with Jira Groups:
1 Press Share to Group to share Vault with Jira Groups.
2 Use the search bar for easy navigation. Enter Group name, then click Share next to the Group you want to add.
3 Review added Group(s). If required, set permissions for each Group, press on the setting icon and choose one of the available options: Allow View, Allow Editing, or Allow Managing and click Close icon.
4 Press Share (Vault name) button to confirm Vault sharing to all selected Groups.
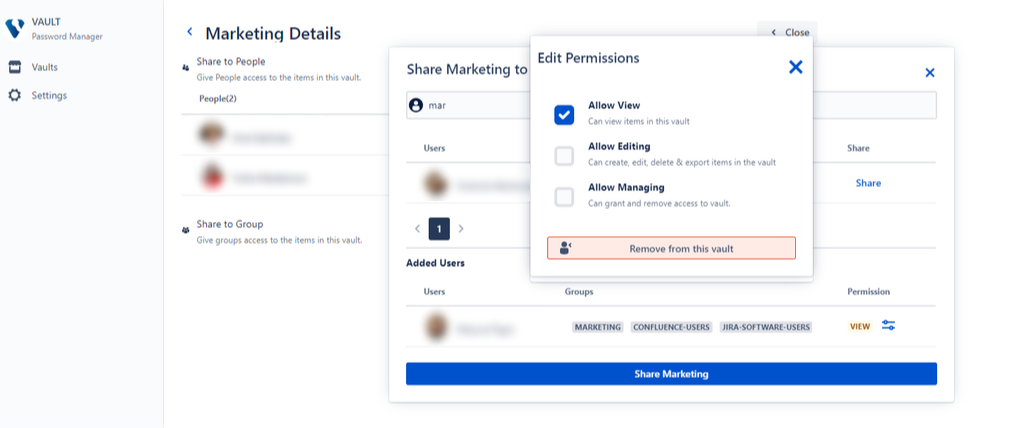
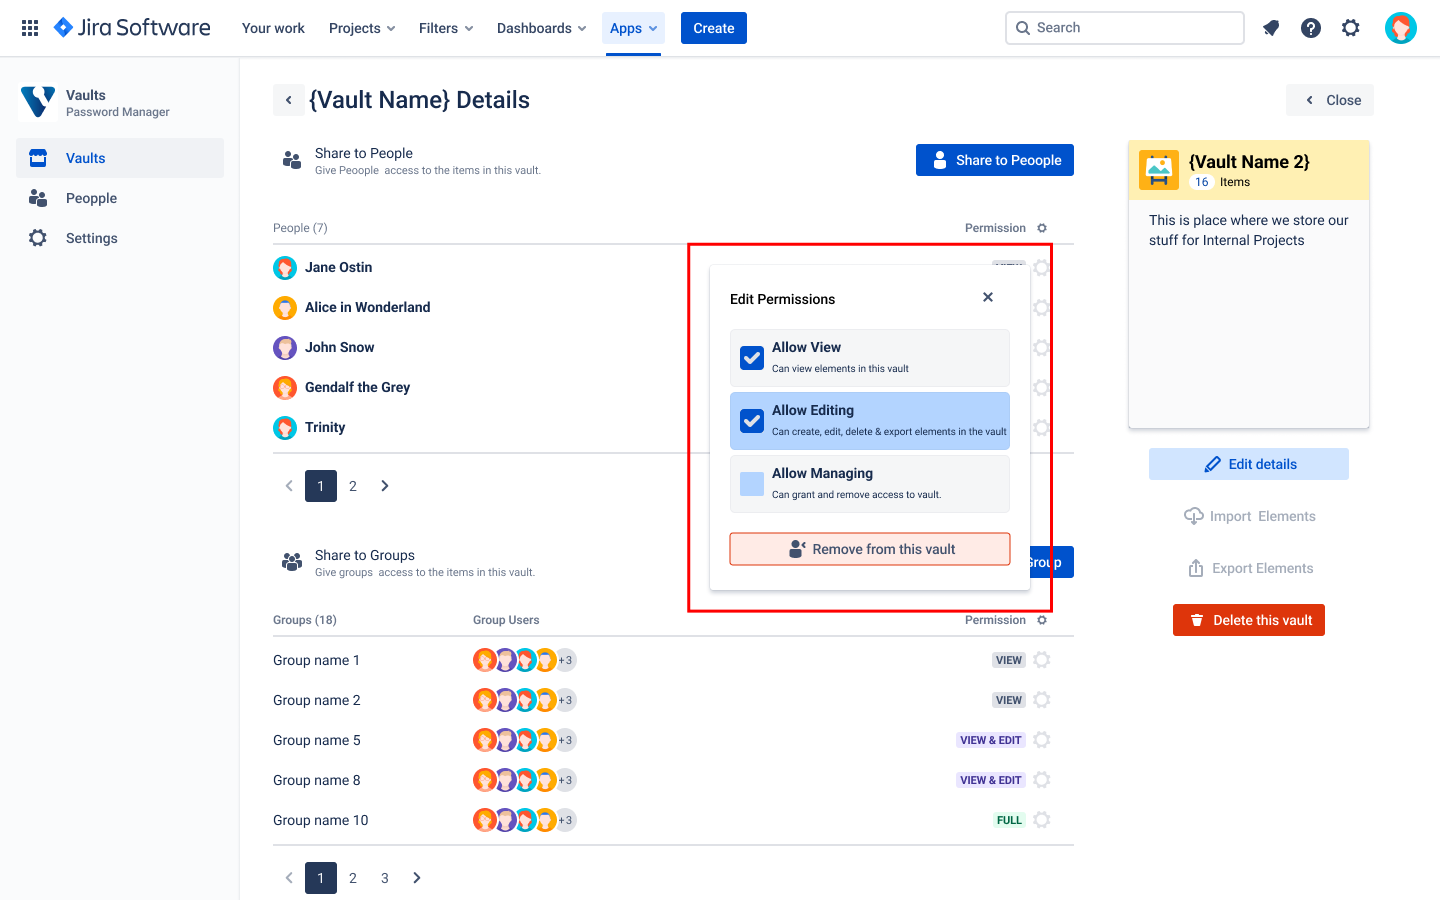
Manage Edit Permissions
Click the Gear icon next to the corresponding User or Group to edit permission.

Select one of the available options:
Allow View. Can view items in the Vault.
Allow Editing. Can create, edit, delete & export items in the Vault.
Allow Managing. Can grant and remove access to the Vault.
Press Remove from this vault to restrict Vault access to the User or Group.
Create and Edit Items
Create New Item
| Info |
|---|
To create Item, you need to have “View&Edit” or "Full" permission in that Vault. |
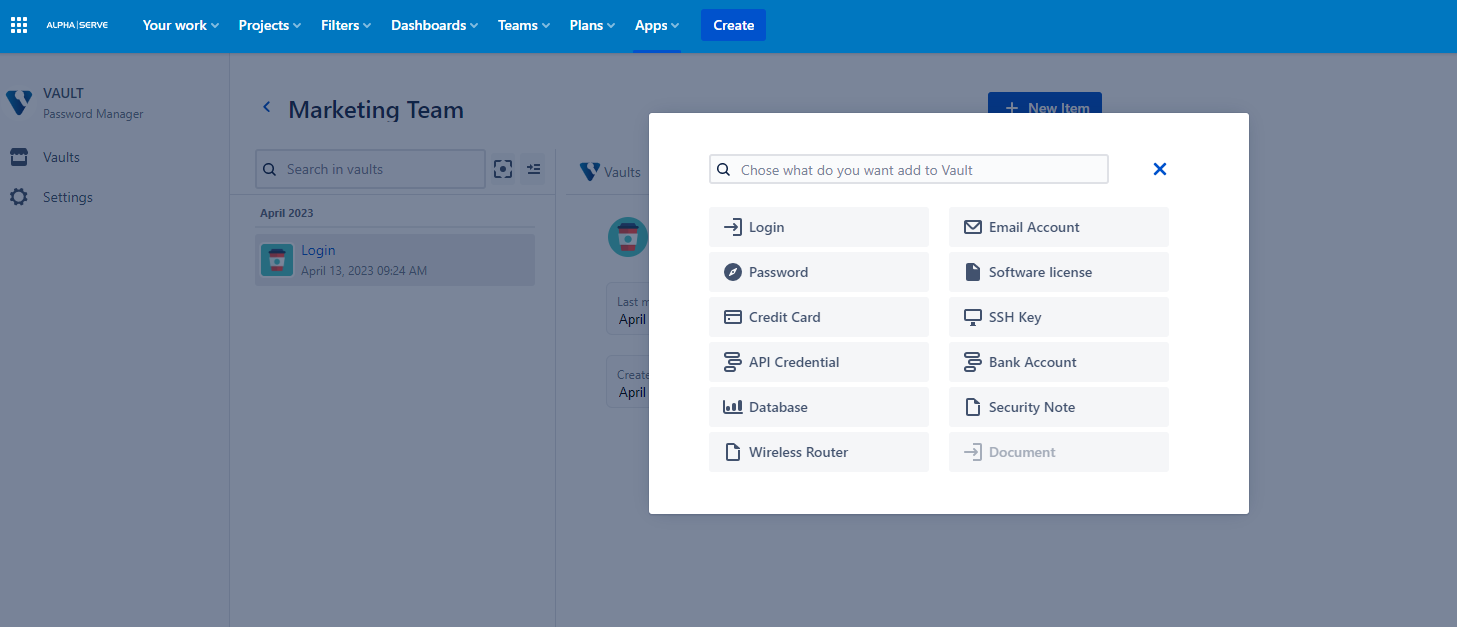
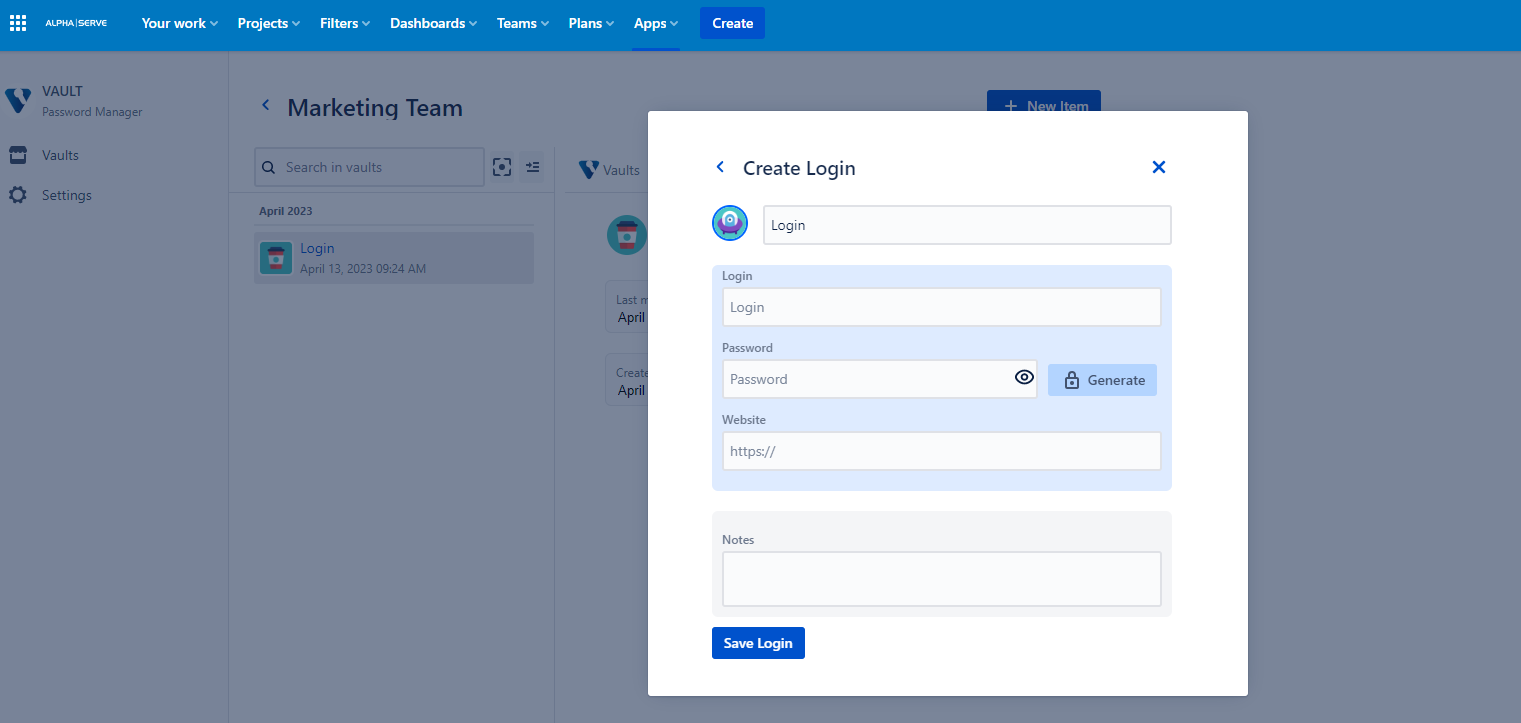
Open Vault and click + New Item button. Note! This button will be visible only if you have required edit permissions in this Vault.
.png?version=1&modificationDate=1682498608640&cacheVersion=1&api=v2)
Choose the type of item you want to add to Vault.
At the moment, such types of credentials with pre-defined fields are supported by Vault Password Manager:
Login
Password
Secure Note
Credit Card
Bank Account
API Credentials
Software License
Email Account
Database
SSH Key
Wireless Router
Each credential type has its own set of pre-defined fields. For some types of credentials, Vault Password Manager offers a built-in password generator. See instructions on how to use it.
Fill out all necessary fields and click Save Login button.
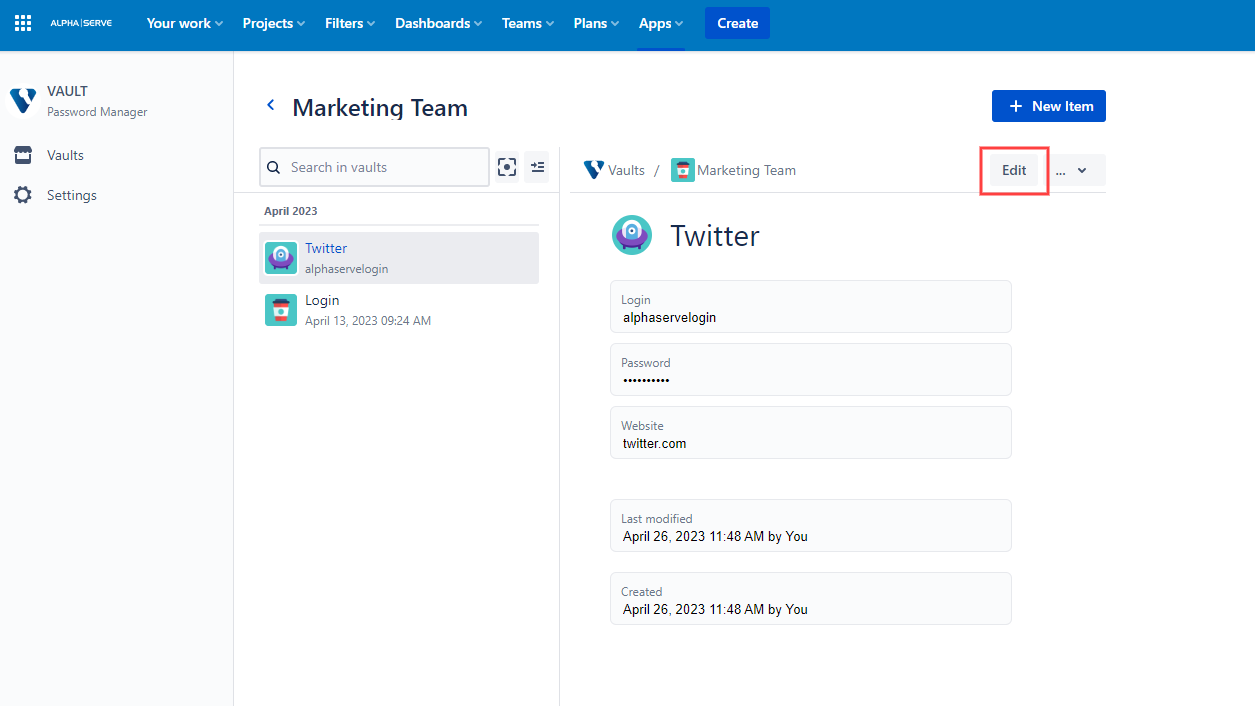
Edit Items
Select the required Item and click the (1) Edit button.
Apply edits and click Save to confirm changes or Cancel to cancel it.
To delete Item, click three-dots icon and press Delete record.